
Before embarking on a self-hosted journey, it is a good practice to check what are the minimum hardware to get you started. Any standard office desktop from the last 10 years should be a good candidate.
- Computer – can’t really do anything without a desktop or at least a laptop
- Minimum 4 physical CPU cores, better 6
- Minimum 6 GB of RAM, better 8 GB
- No dedicated GPU required, built-in in the CPU is a plus for video transcoding for streaming
- You can start with 128GB SSD or HDD for the initial setup to try it out, but realistically if you plan to put all your photos, movies and a backup copy of them on the server, you will need a lot more at some point. Don’t worry it is easy to add more HDDs for your photo or video library, as long as you have space in your computer case for more physical disks
- Physical LAN connection is preferred over Wi-Fi for better performance
- Linux OS already installed – in my examples i will be using Ubuntu 26.04 LTS (official install instructions here), so for easiest follow up use the same. But if you are familiar with another distribution, it should be almost similar
- Basic Linux knowledge – navigating and creating folders, editing and creating files.
In my setup, which all guides will follow for consistency, we will install all the tools in /opt/docker/<appname> , so if you do custom mapping of storage, make sure it is mapped in /opt to have enough space for your applications and their data
Let’s get started!
Docker and Docker Compose
As all of the applications i will focus on in my guides are docker based, we have to install Docker Engine and Docker Compose. Here are the commands that you can use to install them. You can copy and paste them directly in Ubuntu Terminal, type your sudo password and type Y and Enter to confirm and continue when asked
# Add Docker's official GPG key:
sudo apt update
sudo apt install ca-certificates curl
sudo install -m 0755 -d /etc/apt/keyrings
sudo curl -fsSL https://download.docker.com/linux/ubuntu/gpg -o /etc/apt/keyrings/docker.asc
sudo chmod a+r /etc/apt/keyrings/docker.asc

# Add the repository to Apt sources:
sudo tee /etc/apt/sources.list.d/docker.sources <<EOF
Types: deb
URIs: https://download.docker.com/linux/ubuntu
Suites: $(. /etc/os-release && echo "${UBUNTU_CODENAME:-$VERSION_CODENAME}")
Components: stable
Signed-By: /etc/apt/keyrings/docker.asc
EOF

sudo apt update

sudo apt install docker-ce docker-ce-cli containerd.io docker-buildx-plugin docker-compose-plugin

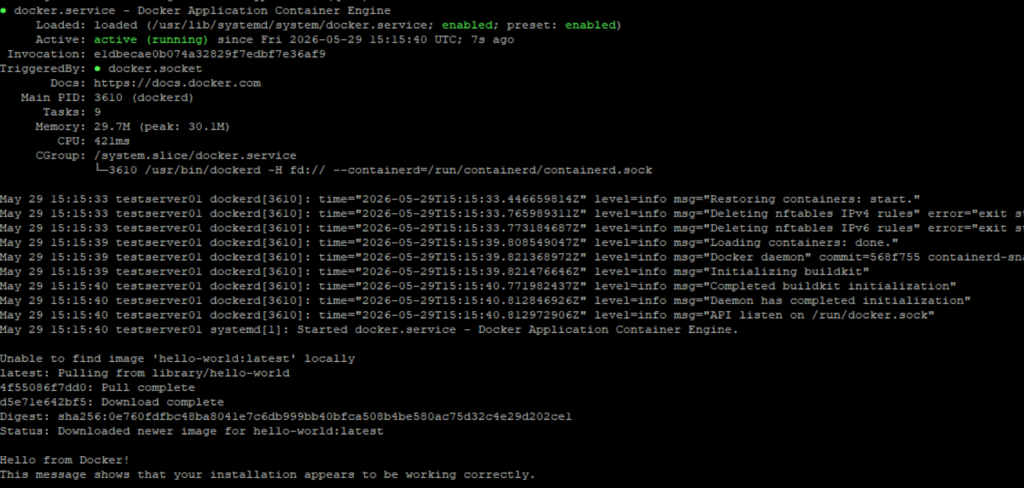
sudo systemctl status docker
#Start docker if needed
sudo systemctl start docker

###Optional###
#Test docker, it should return a message
sudo docker run hello-world
You should see that the service is enabled and active (running), this means everything looks good. If the screen looks frozen or stuck, try Enter or Ctrl + C (hold control and press C to return to terminal). If you run the optional part from above commands, you should see also Hello from Docker! like at the bottom below
This is everything we need to start installing self-hosted applications. See our next article for installing your first application – Immich.


Pingback: Self-hosted lab journey guide – Ilia Dimitrov's Blog